
1. 들어가기 전에
* 프로젝트 구조
- 앞선 장에 이어 프로젝트 디렉토리 구조는 다음과 같이 설정해두었다.

- 컴포넌트 기능을 할 파일들과 routes 페이지 파일을 분리하였다.
- baseURL을 수정하여 import문에 기본적으로 src가 들어갈 수 있도록 설정하기 위해 jsconfig.json을 만들었다.
// jsconfig.json
{
  "compilerOptions": {
    "baseUrl": "src"
  },
  "include": ["src"]
}
- 라우터 파일은 다음과 같다.
// components/Router.js
import React from 'react';
import { HashRouter as Router, Route, Switch, Redirect } from 'react-router-dom';
import Home from '../routes/Home'
import Auth from '../routes/Auth'
import Navigation from './Navigation';
import Profile from "routes/Profile";

const AppRouter = ({ isLoggedIn }) => {
  return (
    <Router>
      {isLoggedIn && <Navigation />}
      <Switch>
        {isLoggedIn ? (
          <>
            <Route exact path="/">
              <Home />
            </Route>
            <Route exact path="/profile">
              <Profile />
            </Route>
            <Redirect from="*" to="/" />
          </>
        ) : (
          <>
            <Route exact path="/">
              <Auth />
            </Route>
            <Redirect from="*" to="/" />
          </>
        )}
      </Switch>
    </Router>
  )
}

export default AppRouter;
- 로그인 여부는 props로 받아오고 있으며, 그 여부에 따라 다른 라우트들을 보이도록 하였다.
- 로그인이 되어있지 않으면 루트주소는 Auth 컴포넌트를 보여주며 그 외의 주소를 모두 루트주소로 리다이렉트 시킨다.
- 네비게이션 컴포넌트는 다음과 같다.
// /components/Navigation.js
import React from 'react';
import {Link} from 'react-router-dom'

const Navigation = () => {
  return (
    <nav>
      <ul>
        <li>
          <Link to="/">Home</Link>
        </li>
        <li>
          <Link to="/profile">My Profile</Link>
        </li>
      </ul>
    </nav>
  );
};

export default Navigation;
- Auth.js는 다음과 같이 미리 만들어 두었다.
// routes/Auth.js
import React, { useState } from 'react';

const Auth = () => {
  const [email, setEmail] = useState('');
  const [password, setPassword] = useState('');
  const [newAccount, setNewAccount] = useState(true);
  const [error, setError] = useState("");
  const onChange = (event) => {
    const {target: {name, value}} = event;
    if(name === "email"){
      setEmail(value)
    } else if (name === "password"){
      setPassword(value)
    }
  }

  const onSubmit = async (event) => {
    event.preventDefault();
  }

  const toggleAccount = () => setNewAccount((prev) => !prev);
  const onSocialClick = (event) => {
    console.log(event.target);
  }

  return (
    <div>
      <form onSubmit={onSubmit}>
        <input name="email" type="email" placeholder="Email" required value={email} onChange={onChange}/>
        <input name="password" type="password" placeholder="Password" required value={password} onChange={onChange}/>
        <input type="submit" value={newAccount ? "Create Account" : "Sign In"} />
        {error}
      </form>
      <span onClick={toggleAccount}>{newAccount ? "Sign in" : "Create Account"}</span>
      <div>
        <button name="google" onClick={onSocialClick}>Continue with Google</button>
        <button name="github" onClick={onSocialClick}>Continue with Github</button>
      </div>
    </div>
  );
};

export default Auth;
- 토글키로 버튼이 회원가입버튼과 로그인(Sign In)버튼이 번갈아 뜨도록 하였다. 여기서 newAccount 상태를 이용하여, 로그인 할것인지 회원가입할 것인지를 체크할 수 있도록 하였다.
- 이메일과 비밀번호는 useState로 관리하며 onChange함수로 입력시 상태가 변경되도록 하였다. 이 때 구조분해할당을 통해 name에는 event.target.name을, value에는 event.target.value를 담도록 하였다.
* 인증 기능 사용
- 인증 기능을 사용하려면 firebase/auth를 먼저 임포트해야한다. 이는 지난 장에서도 봤듯이 fbase.js에 설정해 두었다.
// fbase.js
import firebase from 'firebase/app';
import "firebase/auth";

const firebaseConfig = {
  apiKey: process.env.REACT_APP_API_KEY,
  authDomain: process.env.REACT_APP_AUTH_DOMAIN,
  projectId: process.env.REACT_APP_PROJECT_ID,
  storageBucket: process.env.REACT_STORAGE_BUCKET,
  messagingSenderId: process.env.REACT_APP_MESSAGIN_ID,
  appId: process.env.REACT_APP_APP_ID
};

firebase.initializeApp(firebaseConfig);

export const firebaseInstance = firebase;
export const authService = firebase.auth()
- 기본적으로 파이어베이스 문서에서는 인증서비스를 사용하기위해 firebase.auth()를 적지만 우리는 authService라는 변수를 적어서 사용할 것이다.
- 또한, firebase 인스턴스를 사용할 경우에는 firebaseInstance라는 변수를 이용할 수 있도록하였다.
2. 가입과 로그인
* 초기설정
- 인증기능을 사용하기 위해 Auth.js에 위에서 export한 변수를 import해야한다.
// routes/Auth.js
import { authService, firebaseInstance } from 'fbase';
import React, { useState } from 'react';

//...
- 이제 로그인 메서드의 사용 설정을 해야한다.

- 위와 같이 파이어베이스 콘솔에서 Sign-in method를 클릭한다.
- 우리는 이메일가입과 구글, 깃허브를 사용할 것이므로 각각 사용설정을 해보자.

- 이메일은 간단하게 주소와 비밀번호를 사용하는 곳의 토글키를 눌러 활성화시키고 저장한다.
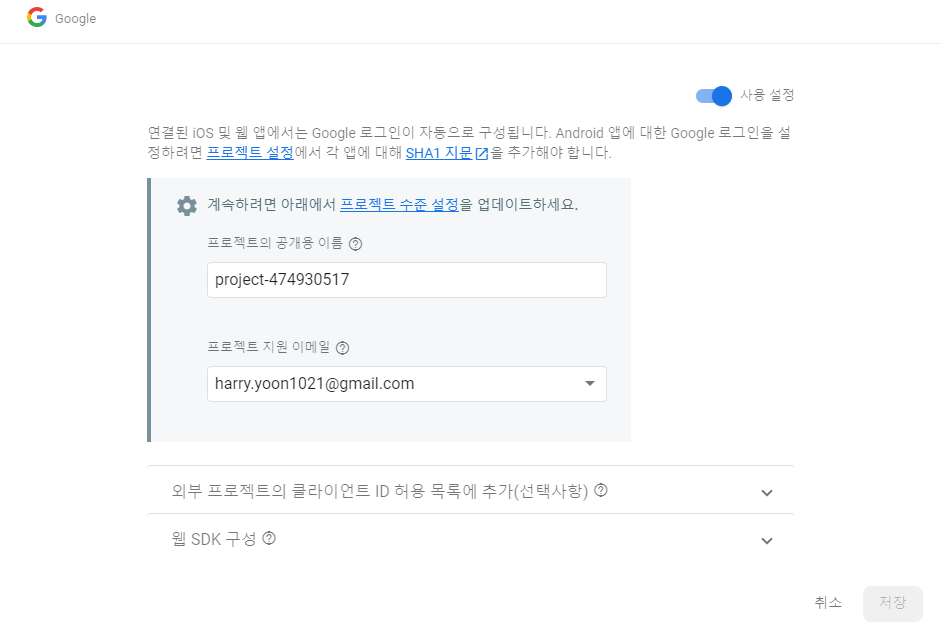
- 구글도 마찬가지로 활성화시킨후, 이메일에는 자신의 이메일을 적고 저장한다.
- 깃허브는 먼저 자신의 깃허브 Settings/Developer settings메뉴에 들어가서 Oauth Apps 설정을 해줘야 한다.

- New Oauth App을 클릭하여 추가하자. 홈페이지 주소는 지금은 없으므로 임의로 파이어베이스에서 콜백URL로 받은 주소의 루트부분까지만 작성하였다.
- 그리고 가장 마지막 칸인 Authorization callback URL은 위의 콜백 주소를 복사하여 작성하고 등록하자.
- 등록을 마치면 클라이언트 ID와 secrets키를 받을 수 있다. 이들을 위의 빈칸에 각각 넣으면 깃허브 인증을 사용할 수 있다.
* 이메일 가입 및 로그인
- 이메일 가입은 미리 만들어둔 양식을 이용하여 사용자가 입력한 이메일 주소와 비밀번호의 유효성을 검사하고 createUserWithEmailAndPassword 메서드에 전달한다. 로그인의 경우에는 signInWithEmailAndPassword 메서드를 호출하여 사용한다.
// 가입
firebase.auth().createUserWithEmailAndPassword(email, password)
  .then((userCredential) => {
    // Signed in
    var user = userCredential.user;
    // ...
  })
  .catch((error) => {
    var errorCode = error.code;
    var errorMessage = error.message;
    // ..
  });

// 로그인
firebase.auth().signInWithEmailAndPassword(email, password)
  .then((userCredential) => {
    // Signed in
    var user = userCredential.user;
    // ...
  })
  .catch((error) => {
    var errorCode = error.code;
    var errorMessage = error.message;
  });
- 파이어베이스 문서에서는 위와 같이 소개하고 있다. 이 때 프라미스 객체를 반환한 것을 알 수 있으므로, 우리의 앱에는 async await을 사용하였다.
// routes/Auth.js

// ...
  const onSubmit = async (event) => {
    event.preventDefault();
    try {
      let data;
      if (newAccount) {
        // create account
        data = await authService.createUserWithEmailAndPassword(email, password);
      } else {
        // log in
        data = await authService.signInWithEmailAndPassword(email, password);
      }
      console.log(data)
    } catch(error){
      console.log(error);
      setError(error.message)
    }
  }
// ...
* 소셜 로그인
- 구글과 깃허브를 이용한 로그인 및 가입을 구현해 보자.
- 소셜 로그인 버튼을 클릭하면 팝업을 띄우며 소셜 계정을 이용하여 접근하도록 할 것이다. 만약 기존에 가입된 계정이 있다면 로그인 될것이고, 없다면 자동으로 가입되며 로그인 된다.
 // routes/Auth.js

 // ...
   const onSocialClick = async (event) => {
    const {target:{ name }} = event;
    let provider;
    if(name === "google"){
      provider = new firebaseInstance.auth.GoogleAuthProvider();
    } else if(name === "github"){
      provider = new firebaseInstance.auth.GithubAuthProvider();
    }
    const data = await authService.signInWithPopup(provider);
    console.log(data);
  }

// ...
- 먼저 제공업체 객체의 인스턴스를 생성해야한다. new firebase.auth.GoogleAuthProvider()와 같은 방식으로 만들 수 있다.
- 그리고 팝업 창을 사용하기 위해 signInWithPopup메서드를 호출하였다.
* 인증 상태 관찰
- 위와 같이 작성 후 로그인을 하면 개발자 도구의 Application에서는 로그인이 된 것을 확인할 수 있지만 실제 화면에서는 그렇지 못하다. 그 이유는 처음에 화면이 뜰 때는 파이어베이스 설정을 하는 중이므로, 설정 전에 화면이 렌더링 되면서 user를 인식하지 못하기 때문이다.
- 따라서 처음에 로딩창을 보여주다가 파이어베이스 인증 설정이 완전히 끝났을 경우 정상화면을 보여주도록 하자.
// components/App.js
import React, { useState, useEffect } from 'react';
import AppRouter from './Router'
import { authService } from "fbase";
function App() {
const [init, setInit] = useState(false);
const [isLoggedIn, setIsLoggedIn] = useState(false);
useEffect(() => {
authService.onAuthStateChanged((user) => {
if(user){
setIsLoggedIn(true);
} else {
setIsLoggedIn(false);
}
setInit(true)
})
}, [])
return (
<>
{ init ? <AppRouter isLoggedIn={isLoggedIn}/> : "Initializing." }
<footer>© Nwitter {new Date().getFullYear()}</footer>
</>
);
}
export default App;
- 초기에 init을 false로 두고, Initializing이 화면에 뜨도록한다.
- onAuthStateChanged를 이용하면 유저 상태의 변화를 감지할 수 있다. 이를 useEffect에 넣어서 user가 있는지 체크하여 isLoggedIn 상태를 변경하고, init 상태를 true로 변경하도록한다.
- init이 true일 경우에 기존의 화면 컴포넌트(AppRouter)를 렌더링하도록 하였다.
3. 로그아웃
- 로그아웃은 Profile 페이지에서 가능하도록 하였다.
// routes/Profile.js
import { authService } from 'fbase';
import React from 'react';
import { useHistory } from 'react-router-dom';

const Profile = () => {
  const history = useHistory();
  const onLogOutClick = () => {
    authService.signOut()
    history.push('/');
  };

  return (
    <>
      <button onClick={onLogOutClick}>
        Log Out
      </button>
    </>
  );
};

export default Profile;
- 로그아웃도 firebase.auth()를 사용하여 구현할 수 있다. signOut 메서드를 호출만 하면 로그아웃이 이루어진다.
- 로그아웃이 이루어진 후에 루트페이지로 이동할 수 있도록 useHistory를 사용하였다. 여기서 굳이 isLoggedIn상태를 관리할 필요는 없다. 왜냐하면 루트페이지에 가게되면 위에서 만든 useEffect내의 초기화 기능을 통해 변경되기 때문이다.
참고
Firebase 인증
Firebase 인증plat_iosplat_androidplat_webplat_cppplat_unityplat_nodeplat_java 대부분의 앱에서 사용자의 신원 정보를 필요로 합니다. 사용자의 신원을 알면 앱이 사용자 데이터를 클라우드에 안전하게 저장할 수
firebase.google.com
Watch Now - 노마드 코더 Nomad Coders
nomadcoders.co
'Server > Firebase' 카테고리의 다른 글
| <파이어베이스> 필터와 정렬 (0) | 2021.07.18 |
|---|---|
| <파이어베이스> 파일 업로드 (0) | 2021.07.17 |
| <파이어베이스> 게시글 CRUD (0) | 2021.07.15 |
| <파이어베이스> 파이어베이스와 리액트 준비 (0) | 2021.07.11 |
| <파이어베이스> 파이어베이스 소개 (2) | 2021.07.07 |


